If you have been a fan of mine for some time, you know that every so often I make WIld Blackberry Jam and make it available for purchase to my exclusive newsletter list! Well this year is one of those years! I not only have made some scrumptious SEEDLESS Jam out of the plethora of WIld Blackberries here on the farm, but I have also made my own HOMEMADE PECTIN!!
Pectin from the stores work fine, but are highly REFINED. I have found and used Pomona’s Pectin successfully, but at $5-6/box, it gets expensive quick! So I researched how to make my own pectin and VOILA! it was a success!

There is an old apple tree in our front yard that has not produced any apples for over 8 years and is now in production mode, I couldn’t be happier! I am not sure what type of apple it is EXACTLY, but the apples are ripening well. One thing that is good with fruit trees is to prune/thin them out to make room for the OTHER apples to grow larger. Thinning it out produced a few boxes of small VERY tart apples. This is exactly what you need to make your homemade pectin as the tarter the apple, the more pectin it contains!
So after gathering up the small, green apples, I wash them, de-stem them and get them into my large stainless steel stock pot to cook down. It smells REALLY good while it is cooking down. It reminds me of making applesauce, but it is SOOO sour that it is only good for the pectin!
 After it is cooked down, I use my immersion blender to get them really broken down to extract as much pectin as possible.
 At this point, I keep stirring it so it will not scorch on the bottom. Believe me, it WILL scorch onthe bottom as I have done it before! Yucky burnt taste is NOT what you want in your pectin to use in your jam!
Then set up a jelly bag, or clean t-shirt covered pan to extract the pectin. I chose to use a jelly bag as that is what I had to use, and I could also tie it up to the cupboard to drip using gravity to my advantage!
 Now you can let it ALL drip on its own if you want to use it to make jelly and it not be cloudy, OR you can gently squeeze it out as you can to extract as much as possible. I did the latter as I am making jam and I am not concerned about cloudiness 🙂 Plus, when I would gently squeeze it out, I ended up with almost twice as much as when I did not squeeze it out!
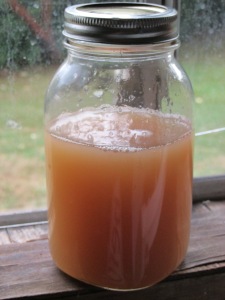 Here is one jar of it that I extracted. It reminds me of soupy jello as it is slick feeling, but still soupy, not too thick. The way I found in my research to test it is to take 1 tbsp of Rubbing Alcohol in a small bowl and drop in 1 tsp of pectin into it. Use a fork to try & pull the pectin out of the alcohol. If it gels up and is thick, you know your pectin is ready to use. If it does not, then you need to cook your pectin down some more to get it to me less watery for it to work. **OF COURSE DO NOT EAT THE PECTIN YOU TEST IN THE ALCOHOL!! IT IS ONLY FOR THE TEST, THEN DISCARD!!**
Now I have my pectin made, onto the BLACKBERRIES!!
 Since this year has been abnormally hotter than in years past, EVERYTHING is ripening faster than usual. For example the blackberries! They normally wouldn’t be ready till Mid-August, BUT were ready Mid-July!! So every day, for 2-3hrs/day, I am out picking berries. There are literally millions of them, no kidding, millions of them! Each day we pick, there are so many pink and green ones that have not ripened, that I am guaranteed to return to the very same spots I picked from to see MORE ripe blackberries! So this means, naturally, that I have to make some JAM!! I actually take the time to make my Blackberry Jam Seedless, as this is the only way my husband will eat it, and I prefer it as well 🙂 It takes on a jelly like consistency with some of the pulp from the berries too. It is so delicious!
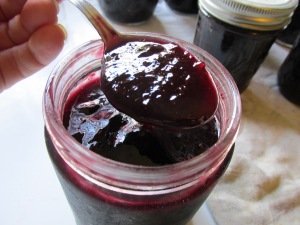 Here is the finished product with my wild blackberries and homemade pectin! For all purposes it is ORGANIC as the blackberries grow on our lower field, far away from pollution and they are not sprayed. Same thing with the apples I used to make the pectin as well. The sugar is Organic, so I would call it am Organic Jam 🙂
I am selling a few of the half pint jars I made and I will make it exclusive to my newsletter subscribers! You can sign up here if you are not already on the list. I release exclusive sales and Limited Edition Items to my newsletter subscribers 1st!
So leave me a comment below and let me know………………..
Have you ever heard of homemade pectin? Will you try it our for yourself? How about jam making? Tell me your stories!


